
Outline
Overview
RealVNC is a Virtual Network Computing (VNC) server which provides a securely authenticated and encrypted way for users to create and view a virtual desktop on an LC cluster (czvnc, rzvnc, or scfvnc). Once logged into this desktop via RealVNC's VNC Viewer, users are able to open a terminal and ssh to other LC machines. Connections to LC machines via VNC Viewer persist even if no client is actually viewing it.
Usage Instructions
Before connecting
- Ensure the proper account(s). All users should have accounts available on the czvnc cluster, and RZ and SCF users should also have their accounts active in those respective centers.
- Open the RealVNC client. (NOTE You *must* use the RealVNC client to connect.)
- On the OCF (CZ or RZ), you may install the RealVNC client from your LLNL workstation's software catalog for MacOS or Windows and via the LLNL YUM repository on Linux. Alternatively, LLNL users can access the latest approved downloads on OneDrive. Non-LLNL users should contact the LC Hotline to get a download of version 7 of the RealVNC client for installation on their desktops. VNC clients not supplied by RealVNC will not work.
- On the SCF, the Windows and Linux iSRD workstations already have the RealVNC client installed. In Windows, you can find the "VNC Viewer" client in your normal application menu. In Linux, you can find the RealVNC "VNC Viewer" client by going to your desktop's application menu and looking under the "Internet" sub-menu. If you do not see it, you may need to reboot to load a newer image.
- Click on the VNC Viewer entry to open the client.
Connecting to a VNC session
-
After opening VNC Viewer, enter the host address and port into the address bar. The hostnames for our VNC servers on the CZ, RZ, and SCF are czvnc.llnl.gov, rzvnc.llnl.gov, and scfvnc.llnl.gov. The port for VNC servers is 5999.
- For the CZ enter czvnc.llnl.gov:5999.
- For the RZ,
- Enter rzvnc.llnl.gov:5999 (for LLNL users connected to VPN or onsite).
- For users coming from outside LLNL or the ihpc network, you will first need to set up an SSH tunnel to forward your traffic.
-
Set up a tunnel through a server on an approved network (LLNL or LANL/SNL ihpc node). For example, from an SNL desktop, you might type:
ssh -L 5999:rzvncsso.llnl.gov:5999 ihpc-gate
- Then launch your VNC viewer and connect to localhost:5999
-
- For the SCF, enter scfvnc.llnl.gov:5999.

-
After entering the host address and port, an authentication window will open. Make sure to populate the "User:" field with your LC username. For "Password:", enter your OTP from the appropriate zone:
- For the CZ, use your OCF pin and RSA token.
- For the RZ, use your OCF pin and RZ token.
- For the SCF, use your SCF pin and RSA token.
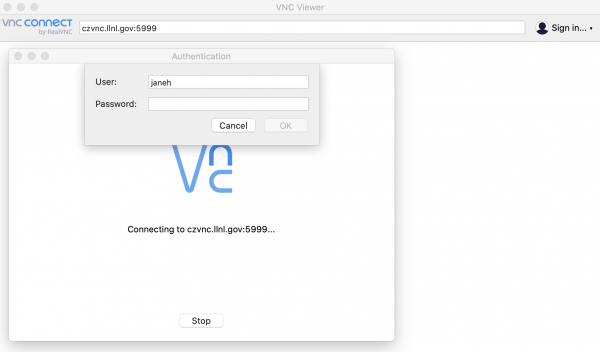
Authentication window: enter your OTP! -
You will now be connected to a session manager. If you have used one of our VNC servers before and have existing sessions, you should see the options Start server, Connect to server, Refresh session listing, and Kill server. (First time users and users with no pre-existing sessions will only see the options Start server, and Refresh session listing). NOTE Tri-lab users will bypass this session manager screen on the CZ and be taken to a remote desktop directly.
- To start a new VNC session, select Start server. The Server description field is optional and may be left blank or can be used to name your session for later identification/usage. Select Ok.
- To connect to an existing session, select the action Connect to server. Highlight the session ID to which you would like to connect and click Ok.
- If you believe you should have an existing session but it does not show up, click Refresh session listing to try to detect it.
- Your remote desktop on a VNC server should now open.
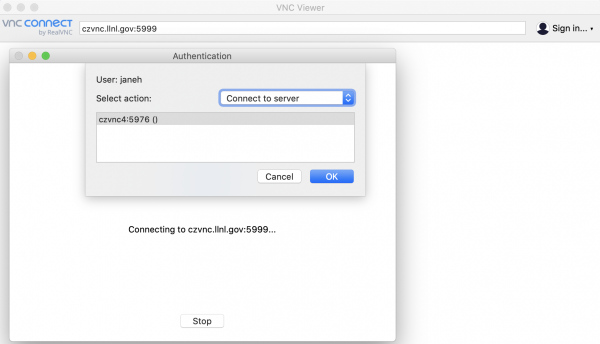
VNC Session Manager options
Troubleshooting connection issues
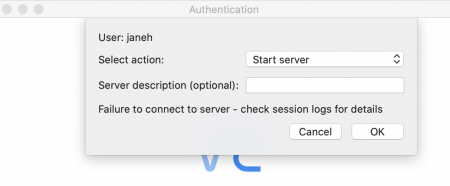
- The most common error messages we see when users try to Connect to server are "VNC server signature was mismatched" and "Failure to connect to server - check session logs for details". If you are seeing either of these error messages, the most likely scenario is that the session to which you are trying to connect no longer exists.
- Please click OK to acknowledge the message and try to start a new session via Start server.
- See the "Note" at the bottom of this section for more info on why your sessions may no longer exist.
- For other issues starting and/or connecting to a session via VNC Viewer (including sessions that crash and sessions that yield the error "Failure to connect to server - check session logs for details"):
- Verify there's nothing wrong with your account:
- Check that your home directory usage is under quota.
- Check that your login files (.login, .login.linux, .profile, .profile.linux, .bashrc, .bash_profile, .cshrc, etc.) do not produce error messages on our VNC servers.
- For example, `module` commands like `module load` will not work on our VNC servers.
- ssh'ing to our VNC servers (czvnc, rzvnc, scfvnc) will allow you to see if your login files produce output/error messages immediately when you login.
- Check to see if you are creating sessions to which you can't connect. A common error is that users will sometimes fail to automatically connect to a newly created session, though the session is created.
- You can check this via the GUI to by refreshing your session listing (at the moment you typically choose between connecting to a server and starting a new server) to see if a new session has been added since running Start server.
- At the command line, you can `cd ~/.vnc` and ` ls -l *.pid` to see the dates of any recently added session files ending in `.pid`.
- Clear out old sessions. If you have determined you have "live" VNC sessions (per step 2B, above) to which you can't connect, they are likely interfering with your ability to create new sessions and will need to be removed:
- Via the GUI,
- Refresh your session listing.
- Select Kill server, highlight the broken session, and hit Ok.
- Choose to Refresh session listing if necessary to ensure your broken/dead sessions no longer appear to be options to which you can connect.
- Via the command line,
- Note the nodes where your existing sessions live. For example, if `ls $HOME/.vnc/*.pid` yields a file of the form `rzvnc3.*.pid`, your session lives on the node `rzvnc3`.
- Remove the *.pid files for broken sessions in your `$HOME/.vnc` directory: `rm $HOME/.vnc/*.pid`
- On each of the nodes where you have sessions, kill any processes associated with those sessions, visible under `ps -u <lc_username>` at the command line. To kill all processes, you can simply run `killall -u <lc_username>`.
- To move between nodes, once you are already on a VNC server, use `ssh`.
- For example, when you are already on czvnc, you can run `ssh e3` or to `ssh czvnc3` get to czvnc3 in particular.
- Via the GUI,
- Verify there's nothing wrong with your account:
NOTE The most common reasons previously created sessions no longer exists include:
- Existing sessions will be cleared out after a reboot or update of any of the VNC nodes.
- Older/recently unused sessions may be killed if the VNC server is heavily taxed and failing to allow new connections.
- Bugs associated with VNC system overuse and user errors can sometimes cause VNC sessions to become corrupted.
Troubleshooting graphical issues
Several users have reported graphical "glitches" on czvnc where some windows and menus in the default desktop environment suddenly appear as solid black regions when focused. LC systems staff are working on a permanent solution, but in the meantime the following steps should correct any server-side display corruption:
-
Press+to open a prompt for a command.
-
Enter restart (or simply r) as the command and pressto reset the desktop and window manager without interrupting your session.
Disconnecting from a VNC session
You may choose to disconnect from a VNC session that you intend to use again later or to completely terminate your VNC session.
- If you want your VNC session to persist so you can connect again later, simply close the VNC session window(s), and your VNC session will persist; next time you try to open a RealVNC session, it will automatically connect you to your existing session.
- To completely terminate your VNC session, there are multiple options:
- The suggested way to terminate your session is to log out from the virtual Linux desktop inside your main VNC session window. This will differ depending on your chosen desktop, but for Gnome, click on the "power button" icon in the upper right of the virtual desktop, select your name, and then click on Log Out. This will exit the VNC server.
-
NOTE ~/.vnc/xstartup file, you may need to put this same command at the end of it, or your VNC session will not terminate properly.):
vncserver-virtual -kill $DISPLAY
-
- Alternatively, you may run the "Kill Server" option from the GUI menu after you have authenticated. Select "Kill Server" from the drop-down menu and then hit "OK".
- The suggested way to terminate your session is to log out from the virtual Linux desktop inside your main VNC session window. This will differ depending on your chosen desktop, but for Gnome, click on the "power button" icon in the upper right of the virtual desktop, select your name, and then click on Log Out. This will exit the VNC server.
Controlling screen resolution
Using dynamic resolution
As of TOSS4, users have the option to use dynamic resolution.
First, users should ensure they are running an updated local VNC Viewer client (version 7.6.0 or higher).
After updating the VNC Viewer client, users can connect to their VNC server as usual. They will see a new “1:1” option on the menu bar at the top of their remote desktop:

Users should then click the leftmost button on this menubar:
Setting screen resolution manually
- Manually setting resolution within an active VNC Session:
- Open a terminal in an active VNC session.
- Use the xrandr command to list supported resolutions.
- Run xrandr in the open terminal
- Supported resolutions are printed to stdout.
- Select an appropriate resolution and use the -s flag when calling xrandr with the desired resolution.
- Example: xrandr -s 1920x1080
- Configuring autostart scripts to set desired resolution at VNC startup:
- Create the file ~/.config/autostart/xrandr.desktop (if it does not already exist)
- Add the following lines to the file and change the XXXXxYYYY to a supported resolution:
-
[Desktop Entry]
Name=Resolution Autoset
Comment=Automatically set resolution
Exec=bash -c "xrandr -s XXXXxYYYY"
Terminal=false
Type=Application
- NOTE Simply pasting the text above without modifying the 4th line containing XXXXxYYYY will cause VNC to not start properly. The line must have a supported resolution put in. Reference section A above to find supported resolutions.
-
- Example of a ~/.config/autostart/xrandr.desktop file using 1440x900 resolution:
-
[Desktop Entry]
Name=Resolution Autoset
Comment=Automatically set resolution
Exec=bash -c "xrandr -s 1440x900"
Terminal=false
Type=Application
- NOTE Nothing else aside from the text above needs to be in the xrandr.desktop file for VNC to startup. Adding # comment lines will cause the file to not be read correctly.
-
Use Cases
A few examples of why LC users might choose to use RealVNC to connect to LC machines:
- To create a persistent interactive session.
As an example, let's say you have a several windows open to remote systems running interactive jobs but need to go home for the evening. After dinner you want to monitor your interactive jobs or perhaps open a Totalview debugger from the compute cluster. With RealVNC, you can set those windows and jobs up in a virtual desktop that is available anywhere you have network access to the server. You can simply log into the CZ or RZ vnc cluster, re-attach to your RealVNC session, and continue where you left off, with all windows remaining the same. RealVNC at LLNL is straightforward to use, secure, highly performant, and compatible with multiple client viewers. - To ssh to LC machines.
Many Windows users in particular find RealVNC's VNC Viewer as convenient alternative to Xwin32 and other ssh clients. - To easily enable graphics on LC machines.
Graphics are enabled on RealVNC by default, so users will not have to enable X11 forwarding in order to work with graphical user interfaces.
Environment
- Machines:RealVNC is only installed on dedicated VNC clusters, with one for each LC center: czvnc.llnl.gov, rzvnc.llnl.gov, and scfvnc.llnl.gov
- Location: RealVNC is launched by connecting to port 5999 on the VNC nodes. See the Usage section below.
- Settings:No special settings are necessary for RealVNC on the server.
- File Systems:The VNC nodes mount the typical LC file systems, including home directories, parallel file systems, and workspaces.
- Reduced Programming Environment: The VNC nodes are intended to provide a gateway to LC clusters and thus have a reduced development environment. Many packages found on clusters in /usr/tce, such as compilers and MPI builds, will not be made available on the VNC nodes. If there are packages that users would like LC to consider supporting on the VNC nodes, please send a request along with justification to the LC Hotline.
Caveats
There are a couple caveats when using RealVNC software to connect to LC machines:
- LC prohibits resource-intensive applications from running directly on the VNC server. To ensure a smooth experience for a large number of simultaneous users, users should use the RealVNC desktop only as a gateway to SSH to other systems, e.g., login nodes for SLIC or compute clusters. For this purpose, some common applications, such as Firefox or apps in /usr/tce, have been disabled. It is permitted to run GUI applications remotely from another system on the virtual desktop such as Firefox or Totalview.
- RealVNC does not support some OpenGL programs. If you require OpenGL support, you will need to use NICE DCV. If you find that running VisIT in vncviewer is not adequate, we suggest you use the VisIT client-server interface.
- LC does not guarantee persistent environments. Users will usually be able to connect to pre-existing sessions and find their virtual desktop (running on one of our vnc clusters) as they were left. However, sessions may be terminated at any time, for example, due to maintenance or system overuse
Help
Please contact the LC Hotline (email lc-hotline@llnl.gov or call 2-4531) if you need help troubleshooting connection issues.
The VNC nodes are intended to provide a gateway to LC clusters and thus have a reduced application environment. Many packages found on clusters such as compilers and MPI builds, are not available on the VNC nodes. If there are packages that users would like LC to consider supporting on the VNC nodes, please send a request along with justification to the LC Hotline.
Additional tips and tricks for using VNC at LC can be found on the CZ Confluence at lc.llnl.gov/confluence/display/LC/VNC+How-to+for+LC. Help is also available from the lc-hotline@llnl.gov, (925) 422-4531.