
Availability
Portability was a major concern during design and implementation of Hopper. To ensure that it would be widely available on a variety of platforms, we chose the Java programming language as the implementation vehicle. As a result, Hopper can be run on virtually any host that supports modern versions of Java, including most variants of Unix, Mac OS X, and Windows.
Hopper can be run on any of LLNL's production computing hosts simply by typing "hopper" at the command line. (Note that PC users must first run X-Win 32 or equivalent, and Mac users must first start the X11 application.) LLNL users can download Hopper for their local systems from http://www-lc.llnl.gov/~jwlong/hopper/
Quick Start Guide
Browsing a file system
File system browsing is performed within directory windows. A directory window presents a view into a file system on a local or remote host (or in file-based archives such as TAR files). Upon start up, Hopper will pop up a directory window for the local host. You can then connect to remote hosts (or open archives) to create additional directory windows.
Browsing in a directory window mostly involves changing the directory currently being viewed. Major ways of changing the current directory include (1) double-clicking on a folder icon, (2) clicking on the navigation buttons in the left-hand part of the toolbar, (3) typing a directory path in the directory-name field (note that you can use the built-in history mechanism as a shortcut).
The two purple icons in the middle of the toolbar allow you to switch between iconic and detailed views of the current directory. Note that in the detailed view, you can expand directory subtrees.
Selecting Entries
To select a file in a directory window, simply click on the item. Multiple files can be selected by dragging with the left mouse button held down. A selection can be extended by first clicking on one item and then shift-clicking on another. Additional items can be selected by clicking on an item with the control key held down. (Use the command key on a Mac.) Also, typing the first few characters of a file's name will cause that file to be selected.
Connecting to a remote system
Upon start up, hopper will show a directory listing for the current directory on the machine on which hopper is running. To connect to a remote system use the Connect menu and choose Connect to Remote. This will bring up a dialog where you can enter the host name, the user name, and the connection protocol (e.g., FTP or SSH). Press the Connect button to bring up a window that displays your home directory on the remote system.
A shortcut for connecting to "storage" is to use the Connect menu and choose Connect to Storage.
Transferring files
After selecting entries and dragging to the desired destination, a drag menu will pop-up from which you can choose an operation to perform—copy, move, create HTAR file, create TAR file, synchronize, and so on. The destination directory can be in the same window or another window (possibly on a different system) The cursor icon will change to a "smiley face" when it is over an allowed drop position. Choose Copy Here from the drag menu. See the transferring files page for details.
Deleting files
Delete files by either (1) selecting the files to delete and then clicking on the trash can icon in the toolbar, or (2) select the files and then choose Delete from the right-mouse menu. By default you will be prompted for confirmation before any files are removed.
How to search for files
Choose Search from the Ops menu to pop up the search dialog. Construct search rules in the obvious way and then click the OK button. Depending on the sort of connection technology being used, you can search files by name, content, date, owner, etc.
The Search tab defines the search, the Results tab contains the results of the search, and the Diagnostics tab contains any error or warning messages generated during the search.
Synchronizing two directories
Hopper can perform rsync-style directory synchronization operations. For example, suppose we want to synchronize from directory DirA on host HostA to directory DirB on host HostB. There are several ways to do this, but for clarity we will show you the most straightforward way. First, open directory windows for both HostA and HostB. Select DirA on HostA and drag it atop the directory icon or name for DirB on HostB. From the resulting pop-up menu, choose Synchronize this Directory.
Before a synchronization operation is actually invoked, a tabbed dialog is displayed that describes the operation and allows you to set various options. Take a look at the Function tab, which is of particular interest. Note that you can perform a dry run. See the synchronizing directories page for more information.
Performing an aggregated copy operation
The aggregated copy is hybrid operation that combines regular copies with HTAR archive creation. It is the best way to transfer large amounts of data from LC production hosts to storage.
To enable this operation, go to Preferences/Operations/Aggregate Copy and make sure the "Enable" box is checked. (It is off by default.)
Once enabled, you can perform an aggregated copy to storage by dragging items from an LC production host window into the storage window, and selecting "Aggregated Copy Here..." from the drop menu. A dialog will pop up which lets you specify how to do the aggregation. See the aggregated copy help page for more information.
Reviewing Disk Usage
To understand how much disk space you're using, and how it is distributed amongst your directories, click the "Pie Chart" icon in the toolbar. This shows a graphical view of your directory that indicates how much data are contained within each sub-directory. You can perform disk usage scans for any directory you can display in Hopper. See the disk usage help page for more information.
Making a directory
To create a new directory or folder click the "New Folder" icon in the toolbar. After you supply the name the new directory will be created in the current directory.
Renaming a file
Click the right-mouse button over a file or directory, and choose Rename from the resultant pop-up menu. After editing the name, press Return (or Escape to cancel the operation).
Changing file permissions
Perform a "right click" on the file(s) of interest and choose Change Permissions from the resultant pop-up menu. There is a Recursively apply changes check box, which when selected will cause the permissions to be changed recursively for all files contained in all selected directories. See the changing permissions page for more information.
Changing file owner/group
Perform a "right click" on the file(s) of interest and choose Change Owner/Group from the resultant pop-up menu. There is a Recursively apply changes check box, which when selected will case the owner/group to be changed recursively for all files contained in all selected directories. See the changing ownership page for more information.
Checking who can access a file
You can display all the users and groups that can access a given file. This is useful for checking if a particular person or group has access to one of your files. It takes into consideration the permissions of all enclosing directories. Perform a "right click" on the file of interest and choose Check Access from the resultant pop-up menu. See the checking access page for more information.
Creating or opening an HTAR file
Hopper can open and create HTAR archives. In directory listings, HTAR archives will be shown with an H-in-a-circle icon. You can double click on one of these icons to show the directory listing for the HTAR archive. Files can be copied out of an HTAR directory just like any other directory. Files cannot be copied into an HTAR directory, however, as HTAR archives are read-only.
HTAR files can be easily created using the drag-and-drop interface. To create an HTAR file, select the files you want to make an archive from, and drag them to a storage or production host window. Choose Make HTAR Archive Here from the drag menu to complete the operation. See the making htar files page for more information.
Creating or opening a TAR file
Hopper can open and create TAR archives. In directory listings, TAR archives will be shown with an T-in-a-circle icon. You can double click on one of these icons to show the directory listing for the TAR archive. Files can be copied into and out of a TAR directory just like any other directory, but beware that copying files into an existing TAR file can be computationally expensive.
TAR files can be easily created using the drag-and-drop interface. To create a TAR file, select the files you want to make an archive from, and drag them to the directory (on the same host) where you want the archive to be created. Choose Make TAR Archive Here from the drag menu to complete the operation. See the making tar files page for more information.
Creating or opening a ZIP/JAR file
Hopper can open and create ZIP (JAR) archives. In directory listings, ZIP (JAR) archives will be shown with a Z-in-a-circle (J-in-a-circle) icon. You can double click on one of these icons to show the directory listing for the ZIP (JAR) archive. Files can be copied into and out of a ZIP (JAR) directory just like any other directory, but beware that copying files into an existing ZIP (JAR) file can be computationally expensive.
ZIP (JAR) files can be easily created using the drag-and-drop interface. To create a ZIP (JAR) file, just select files on the local host you want to make an archive from, and drag them to the directory (also on the local host) where you want the archive to be created. Choose Make ZIP/JAR Archive Here from the drag menu to complete the operation. See the making zip/jar files page for more information.
Viewing a file
To view a local or remote file, double click on the file. For remote files, this will transfer the file to a temporary directory on the local host for viewing. For local files, viewing is done in place. Several types of files can be viewed using Hopper's built-in viewer; this includes jpeg, gif, and png image files, plus text and raw binary files. The viewer is chosen based on the file suffix (e.g., ".jpg"). Alternate viewers can be assigned via the preferences: Preferences/Operations/File Viewer. Files can also be viewed by performing a "right click" on the file of interest and choosing View With from the pop-up menu. See the viewing files page for more information.
Directory Window Overview
A directory window is used to browse a system's or an archive's directory structure, and to initiate operations on them.
Creating Directory Windows
There are a number of ways to create a directory window:
- When Hopper is started, a directory window is automatically created for the local system.
- When a connection is made to a remote host, a directory window is automatically created for that system.
- Double-clicking on a

icon will create a directory window for the corresponding HTAR, TAR, ZIP or JAR archive.
- Clicking the middle mouse button on a directory icon will create a new directory window that displays that directory.
- Selecting Display in New Window in the File menu will create a new directory window that also displays the current directory.
Views
There are four views supported by directory windows:
- Iconic View (

) - An icon and a name is displayed for each directory entry. Use this view for compactness and possible speed-up. There are controls for changing the number of columns and the sort order of the entries.
- Detailed View (

) - Each entry is displayed in its own row along with its metadata (such as size). You can sort on a column's metadata by clicking on the column header. This view presents controls for expanding subdirectories in place.
- Content View (

) - A name and large, content-based icon are displayed for each directory entry. Images are displayed as thumbnails, and other types use pre-generated icons.
- Disk Usage View (

) - This view creates an additional pane showing how disk usage is distributed within the given directory. The number of files and directories, and the overall sizes, are displayed for the top-level directory and all sub-directories.
Browsing
There are a number of ways to specify which directory to display:
- Type a path in the directory name field (just below the toolbar), following by Return. Note that by clicking the left mouse button on the triangle icon to the right of the directory name field, you can pop up a list of recently visited directories on this connection.
- You can revisit directories by using the navigation controls on the left side of the toolbar (they work similarly to navigation controls in Web browsers).
- Double-click a directory icon to display its directory.
Invoking Operations
Hopper supports two types of operations: (1) job-oriented and (2) directory-oriented. Job-oriented operations include file transfers, archive creation, searching, and directory synchronization — operations that run in the background because they can take a long time to complete. Directory-oriented operations include everything else (e.g., directory creation, file rename, file deletion, etc.) — operations that run in the foreground because they are expected to finish quickly. There a number of ways to invoke operations:
- Via the menu bar
- Via the toolbar
- Right-clicking on a directory entry to pop up a menu of operations
- Dragging a group of selected entries to a drop site (which might be white space or another entry in this or another directory window), which will pop up a drag menu that contains a list of operations.
- Putting names of items into the clipboard and then using the Clipboard menu or the right-button menu to operate on clipboard items.
- Double-clicking on a directory entry. Depending on the entry type, a different operation will be invoked. Double-clicking on a directory will display that directory. Double-clicking on a simple file will view that file. Double-clicking on an archive will open that archive in its own directory window.
Selecting Entries
Many operations can be performed on multiple directory entries, but first the entries must be selected by:
- Left-clicking an entry. This will make that entry the only selected item.
- Left-clicking in white space. This will clear the selection.
- Left-clicking an entry while holding down the Ctrl key. This will toggle the selection state of the entry while retaining the rest of the selection.
- Left-clicking an entry while holding down the Shift key. This will extend the selection.
- Holding down the left mouse button in white space and then dragging the mouse to sweep out a selection. If you hold down the Ctrl key when you do this, the selection will be toggled within the drag rectangle.
- Using the Select menu.
Directory Window Drag Menu
A number of operations can be invoked by dragging a group of selected entries to a drop site. A drop site can be in the source directory window or in another directory window. The cursor icon will change to a smiley face when it is over an allowed drop position, and the mouse button can then be released to pop up a drag menu. A drag menu contains a subset of the following operations:
Copy Here
Starts up a file transfer job, which will run in the background. The progress of the job can be viewed by selecting the Transfer Manager item from the Windows menu.
Move Here
Moves the selected files to the destination directory.
Make Symbolic Link Here
Pops up a dialog where you can enter the target and name of a link to create in the destination directory.
Make TAR Archive Here
Pops up a dialog for creating a TAR archive in the destination directory. The archive will contain the selected entries.
Make HTAR Archive Here
Pops up a dialog for creating an HTAR archive in the destination directory. The archive will contain the selected entries.
Make ZIP/JAR Archive Here
Pops up a dialog for creating a ZIP or JAR archive in the destination directory. The archive will contain the selected entries.
Directory Window Menu Bar
File Menu
About Hopper
Pops up an About dialog, which displays the version number, license terms, credits, and contact information.
Display in New Window
Pops up a new directory window that displays the same base directory as the current directory window. This is one way to create a second view into the connected system.
Preferences
Pops up the Preferences dialog, which provides a graphical way of configuring a multitude of user preferences.
Save Preferences
Any changes made to user preferences are automatically saved when Hopper terminates normally (but are not saved if Hopper is abnormally terminated). This menu item forces Hopper to immediately save any changes that have been made to user preferences up to this time.
Close
Closes the current directory window. You will be warned if closing the directory window will terminate the connection or terminate Hopper.
Quit
Terminates Hopper. You will be warned if terminating Hopper will cause currently executing transfer and/or search jobs to prematurely terminate.
Connect Menu
Connect to Local
Creates a new directory window that displays your home directory on the local host.
Connect to Remote
Pops up a dialog where you can enter the host name, the user name, and the connection protocol (e.g., FTP or SSH). Press the Connect button to bring up a window that displays your home directory on the remote system.
Connect to Storage
Connects you to HPSS storage and brings up a window that displays your home directory on storage. If Hopper is unable to use the HPSS protocol to connect to storage, it will pop up a Connect to Remote dialog with appropriate values for host name, user name, and connection protocol (e.g., FTP). You can modify these values, if you like, before pressing the Connect button.
Connect to FIS
Pops up a Connect to Remote dialog with appropriate values for host name, user name, and connection protocol (e.g., FTP) for connecting to the File Interchange Service. You can modify these values, if you like, before pressing the Connect button.
Disconnect
Terminates the connection used by the directory window. Note that this will close all directory windows associated with the connection. You will be warned if terminating the connection would also terminate Hopper.
Clear Connections Cache
For efficiency, and to minimize password prompts, Hopper often caches old connections so that they can be reused. This menu item clears the cache. You would want to do this only if you believe there might be something wrong with one of these cached connections.
{List of Previous Connections}
The last several menu items are a history of connections you have made in the past. Select one of these as a shortcut for connecting to a remote host.
Favorites Menu
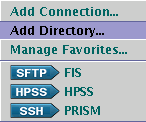
Add Connection
Pops up the Add Favorite Connection dialog, which enables you to add the current connection (i.e., technology, system and directory) as a favorite. The dialog allows you to name the favorite and to choose the folder to store the favorite in.
Add Directory
Pops up the Add Favorite Directory dialog, which enables you to add the current directory as a favorite. The dialog allows you to name the favorite and to choose the folder to store the favorite in.
Manage Favorites
Pops up the Favorites Manager window, which allows you to view and organize your favorites.
{List of Favorites}
The last several menu items are the favorites that you have defined (including folders that contain favorites). Selecting a favorite connection will cause that connection to be established. Selecting a favorite directory will cause that directory to be displayed in the current directory window.
Select Menu
Select All
Selects all entries displayed in the directory window.
Deselect All
Clears the selection in the directory window.
Invert Selection
Inverts the selection in the directory window.
Use Wildcard
Pops up a dialog where you can enter an expression for selecting entries displayed in the directory window. Two types of expressions are accepted: (1) Unix Style (a Unix shell style glob expression) and (2) Regular Expression (a Perl 5 style regular expression). Press Select to replace the current selection.
Ops Menu
Search
Pops up a Search Window, which allows you to initialize a search for files on the system the directory window is connected to.
Make Directory
Pops up a dialog where you can enter the name of a directory you wish to create in the directory being displayed in the directory window. If you specify a relative path, parent directories will be created as needed.
Make Symbolic Link
Pops up a dialog where you can enter the target and name of a link to create in the directory being displayed in the directory window.
Launch Xterm
Launch an xterm window on the system the directory window is connected to. xterm will be started in the directory being displayed in the directory window. This feature is available only when Hopper is running in an X Window system and the directory window is connected to a local Unix system or to a remote host via SSH.
Ops on Selected Entries
This pull-right menu displays numerous operations that can be performed on the files that are currently selected in the directory window:
- Display in New Window - Display the selected directory in its own directory window.
- Display in This Window - Display the selected directory in this directory window.
- Launch Xterm at this Location - Launch an xterm window on the system the directory window is connected to. xterm will be started in the selected directory. This feature is available only when Hopper is running in an X Window system and the directory window is connected to a local Unix system or to a remote host via SSH.
- Display Archive - Display the selected archive (i.e., HTAR, TAR, ZIP or JAR file) in its own directory window. You will then be able to browse the archive and perform operations on its contents.
- View With - This pull-right menu enables you to view the contents of the selected files using either a built-in viewer or an external viewer. See the Operations/File Viewer section of the Preferences dialog in order to establish associations between file extensions and viewers.
- Launch Command - This pull-right menu enables you to launch an external command that operates on the selected files. See the Operations/Launch Command section of the Preferences dialog in order to create command definitions.
- Get Info - Pops up a window that displays metadata (e.g., owner, permissions, size, etc.) for the selected file.
- Check Access - Pops up a window that displays all the users and groups that can access the selected file. This is useful for checking if a particular person or group has access to one of your files. It takes into consideration the permissions of all enclosing directories.
- Delete - Deletes the selected files. You will be given an opportunity to confirm that you really want to perform the operation. In general, once the files/directories are deleted, they become unrecoverable.
- Rename - Enters a mode for editing the name of the selected file. After editing the name, press Return (or Escape to cancel the operation).
- Make Symbolic Link - Pops up a dialog where you can enter the name of a link to create, with the selected file being the target of the link.
- Change Permissions - Pops up a dialog for changing permissions of the selected files. There is a Recursively apply changes check box, which when selected will cause the permissions to be changed recursively for all files contained in all selected directories.
- Change Owner/Group - Pops up a dialog for changing the owner and/or group of the selected files. There is a Recursively apply changes check box, which when selected will case the owner/group to be changed recursively for all files contained in all selected directories.
- Make TAR Archive - Pops up a dialog for creating a TAR archive that will contain the selected files.
Clipboard Menu
Copy Selection to Clipboard
Clears the Hopper clipboard and then copies the names of selected entries to the Hopper clipboard.Clears the Hopper clipboard and then copies the names of selected entries to the Hopper clipboard.
Copy Directory to Clipboard
Clears the Hopper clipboard and then copies the name of the current directory to the Hopper clipboard.
Ops on Clipboard Entries
This pull-right menu displays numerous operations that can be performed on the entries that are currently listed in the Hopper clipboard:
- Copy to this Directory - Copies the files listed in the Hopper clipboard to this directory.
- Move to this Directory - Moves the entries listed in the Hopper clipboard to this directory.
- Synchronize this Directory - Synchronizes the directory listed in the Hopper clipboard to this directory.
- Make TAR Archive in this Directory - Pops up a dialog for creating a TAR archive that will contain the files listed in the Hopper clipboard.
- Make HTAR Archive in this Directory - Pops up a dialog for creating an HTAR archive that will contain the files listed in the Hopper clipboard.
- Make ZIP/JAR Archive in this Directory - Pops up a dialog for creating a ZIP/JAR archive that will contain the files listed in the Hopper clipboard.
Show Clipboard
Displays the list of entries that are in the clipboard.
Clear Clipboard
Clears the Hopper clipboard.
Windows Menu
Audit Manager
Pops up the Audit Manager Window, which displays various operational diagnostics.
Search Manager
Pops up the Search Manager Window, which displays a summary of current and completed search jobs.
Transfer Manager
Pops up the Transfer Manager Window, which displays a summary of current and completed file transfer jobs and archive creation jobs.
Directory Window Right-Mouse Menu
Clicking the right-mouse button over an unselected entry will select that entry and pop up a right-mouse menu. Clicking the right-mouse button over a selected entry will preserve the selection and will also pop up a right-mouse menu. The right mouse menu displays a list of operations that can be performed on the (possibly newly) selected entries. The available operations will vary depending on the number and kind of entries being operated on and the services that are provided by this connection. Here's a full list of possible operations:
Copy to Clipboard
Copies the name of the selected entries to the Hopper clipboard.
Display HTAR File System
Displays the selected file (which is an HTAR archive in this case) in its own directory window.
Display TAR File System
Displays the selected file (which is an TAR archive in this case) in its own directory window.
Display ZIP File System
Displays the selected file (which is an ZIP archive in this case) in its own directory window.
Display JAR File System
Displays the selected file (which is an JAR archive in this case) in its own directory window.
Ops on Clipboard Entries
This pull-right menu displays a number of operations that can be performed on the entries that are currently listed in the Hopper clipboard:
- Copy to this Directory - Copies the files listed in the Hopper clipboard to the selected directory.
- Move to this Directory - Moves the entries listed in the Hopper clipboard to the selected directory.
- Synchronize this Directory - Synchronizes the directory listed in the Hopper clipboard to the selected directory.
- Make TAR Archive in this Directory - Pops up a dialog for creating a TAR archive that will contain the files listed in the Hopper clipboard. The archive will be created in the selected directory.
- Make HTAR Archive in this Directory - Pops up a dialog for creating an HTAR archive that will contain the files listed in the Hopper clipboard. The archive will be created in the selected directory.
- Make ZIP/JAR Archive in this Directory - Pops up a dialog for creating a ZIP/JAR archive that will contain the files listed in the Hopper clipboard. The archive will be created in the selected directory.
Display in New Window
Displays the selected directory in its own directory window.
Display in This Window
Displays selected directory in this directory window.
Launch Xterm at this Location
Launches an xterm window on the system the directory window is connected to. xterm will be started in the selected directory. This feature is enabled only when Hopper is running in an X Window system and the directory window is connected to a local Unix system or to a remote system via SSH.
View With
This pull-right menu enables you to view the contents of the selected file using either a built-in viewer or an external viewer. See the Operations/File Viewer section of the Preferences dialog in order to establish associations between file extensions and viewers.
Launch Command
This pull-right menu enables you to launch an external command that operates on the selected file. See the Operations/Launch Command section of the Preferences dialog in order to create command definitions.
Get Info
Pops up a window that displays metadata (e.g., owner, permissions, size, etc.) for the selected file.
Check Access
Pops up a window that displays all the users and groups that can access the selected file. This is useful for checking if a particular person or group has access to one of your files. It takes into consideration the permissions of all enclosing directories.
Delete
Deletes the selected files. You will be given an opportunity to confirm that you really want to perform the operation. In general, once the files/directories are deleted, they become unrecoverable.
Rename
Enters a mode for editing the name of the selected file. After editing the name, press Return (or Escape to cancel the operation).
Make Symbolic Link.
Pops up a dialog where you can enter the name of a link to create, with the selected file being the target of the link.
Change Permissions
Pops up a dialog for changing permissions of the selected files. There is a Recursively apply changes check box, which when selected will cause the permissions to be changed recursively for all files contained in all selected directories.
Change Owner/Group
Pops up a dialog for changing the owner and/or group of the selected files. There is a Recursively apply changes check box, which when selected will case the owner/group to be changed recursively for all files contained in all selected directories.
Make TAR Archive
Pops up a dialog for creating a TAR archive that will contain the selected files.
Make ZIP/JAR Archive
Pops up a dialog for creating a ZIP or JAR archive that will contain the selected files.
Directory Window Toolbar
|
|
Go BackRevisit a directory by going back one. Hold down left mouse button to see a list of directories you have recently visited; to return to a directory, choose it from the list. |
|
|
Go ForwardRevisit a directory by going forward one. Hold down left mouse button to see a list of directories you have recently visited; to return to a directory, choose it from the list. |
|
|
Go to ParentClick to display parent directory. Hold down left mouse button to see a list of all ancestor directories; to display an ancestor, choose it from the list. |
|
|
Go HomeClick to display home directory. |
|
|
ReloadClick to reload current directory. |
|
|
Detailed ViewClick this toggle to change mode so that directories are displayed in a detailed, hierarchical view. |
|
|
Iconic ViewClick this toggle to change mode so that directories are displayed with minimal information. |
|
|
Content ViewClick this toggle to change mode so that content-based icons are displayed for each item, including thumbnails for image files. |
|
|
Disk Usage ViewClick this toggle to enable disk usage view, which shows disk usage information for the current directory and its contents. |
|
|
Toggle CacheClick this toggle to change mode so that directory lists are cached. This can speed up browsing, and is especially appropriate when browsing a (mostly) read-only directory structure, such as an anonymous FTP site. Regardless of this setting, Hopper will refresh the directory when it completes an operation that directly affects it (e.g., hopper will refresh the destination directory when a transfer completes). |
|
|
Toggle Hidden FilesClick this toggle to change mode so that hidden values are displayed or hidden. Hidden files are files that are normally not displayed (e.g., dot files on Unix systems). |
|
|
Launch XtermClick to launch an xterm window on the system the directory window is connected to. xterm will be started in the directory currently being displayed. This button is enabled only when Hopper is running in an X Window system and the directory window is connected to a local Unix system or to a remote system via SSH. |
|
|
Make DirectoryClick to pop up a dialog where you can enter the name of a directory you wish to create in the directory currently being displayed. If you specify a relative path, parent directories will be created as needed. |
|
|
DeleteClick to delete the selected files. By default you will be prompted for confirmation before any files are removed. |
|
|
StopClick to stop the current directory-type operation. |
Transferring Files and Directories
Hopper uses a simple drag-and-drop mechanism for transferring files. After selecting entries and dragging to the desired destination, a drag menu will pop-up from which you can choose an operation to perform—copy, move, create HTAR file, create TAR file, synchronize, and so on. The destination directory can be in the same window or another window (possibly on a different system). The cursor icon will change to a "smiley face" (
) when it is over an allowed drop position. Choose Copy Here from the drag menu to initiate a copy. By default, Hopper will choose the transfer mechanism to use (SFTP, CP, FTP, etc.) using criteria such as transfer speed and minimizing authentications. Through preferences one can opt to see all of the possible transfer options and choose the desired option explicitly.
Transfer Manager Dialog
The Transfer Manager Dialog displays a one-line summary of transfer jobs initiated in the current Hopper session. By default it pops up once a transfer begins, and closes if the transfer completes without error. You can display the Transfer Manager window at any time using the Windows menu.
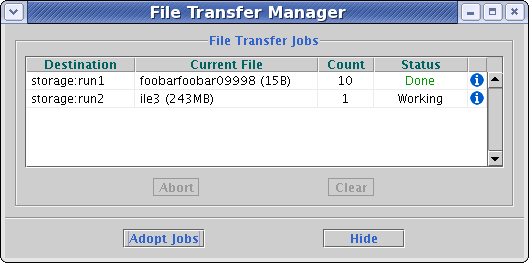
To see additional details about a particular transfer job, press the "info" icon or double click on the job's status line. To abort a transfer job, highlight the job(s) and press the Abort button. To adopt jobs that were initiated in previous Hopper sessions, press the Adopt Jobs button.
Transfer Monitor Dialog
The Transfer Monitor window has details about a specific transfer job, including the source and sink information, the paths requested in the transfer, the transfer rates and file counts (if available), and any diagnostic messages including errors, warnings, and comments.
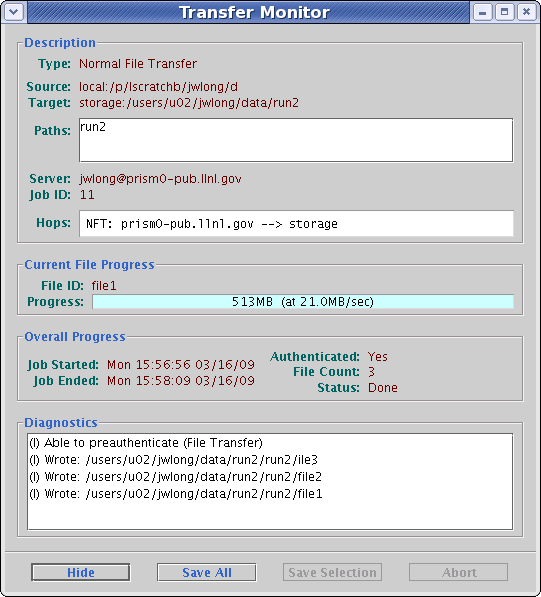
To abort an active job, press the Abort button. To save all or part of the diagnostic messages, use the Save All or Save Selection buttons.
Searching for Files and Directories
Hopper has a powerful search operation that allows searching of file properties, and, in some cases, content. To initiate a search use the Ops -> Search... menu item. The resulting dialog opens to the search definition tab. Use the form to construct your search query. If you're searching a Unix host the option to search file content is available. On non-Unix hosts this option is not available.
Search Manager Dialog
The Search Manager Dialog displays a one-line summary of search jobs initiated in the current Hopper session. You can display the Search Manager window at any time via the Windows -> Search Manager menu item.

To see additional details about a particular search job, press the "info" icon or double click on the job's status line. To abort a search job, highlight the job(s) and press the Abort button. To adopt jobs that were initiated in previous Hopper sessions, press the Adopt Jobs button.
Search Dialog
The Search window has tabs that allow you to define a search, view search results, and view search diagnostics. It is displayed when you initiate a new search via the Ops->Search menu item.
Search Tab
The Search tab is the first you see when you invoke a new search. This tab allows you to set the starting directory for the search, which will default to the directory you were viewing when you started the search.
The search rules section allows you to specify the criteria for which you are looking. There are many options for different criteria as well as different comparisons. For example, the filename search supports these comparisons:
- Unix glob wildcards ("matches") [DEFAULT]
- Exact match ("matches")
- A string embedded in the middle of a filename ("contains")
- A filename that starts with the given string ("starts with")
- A filename that ends with the given string ("ends with")
On Unix hosts one can also search the file contents with the "Contains text" criteria. Searches can be case sensitive or insensitive.
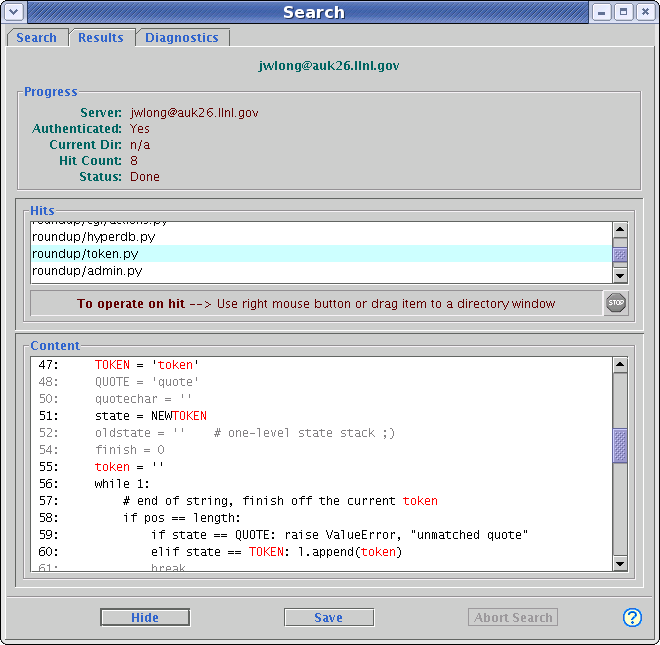
Note that search rules can be saved for future use; this makes reissuing complex searches much easier. Also note that searches can be configured to show the line numbers from the resulting files as well as to optionally show lines of context around matching content.

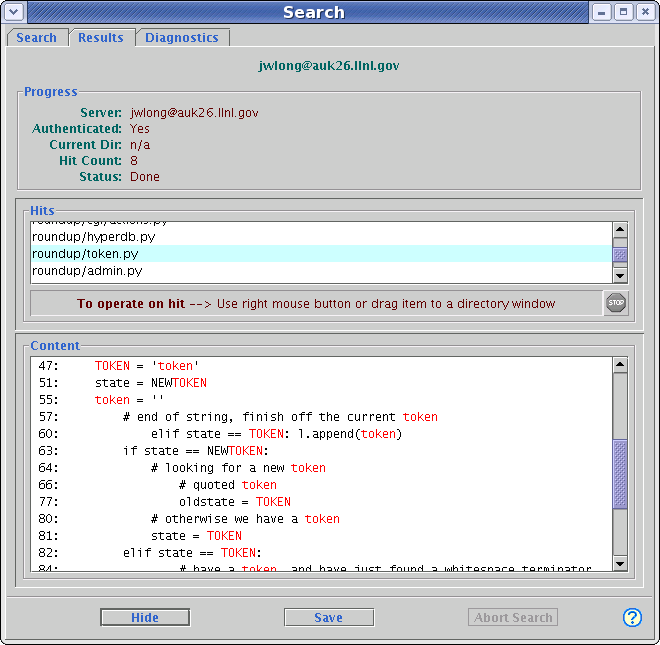
Search Results Tab
The Results Tab shows the results of the given search. The Progress section describes the search in a high-level, including how many hits were found and the final status. The Hits section lists the files that met the search criteria. You can highlight these files and use the right-mouse menu to operate upon the search hits. If you did a content search, the Content section will show the matching content from the file selected in the Hits section.
Additional lines of context will be shown if you selected that option. In this example, one line of context was added:
To abort an active job, press the Abort Search button. To save the diagnostic messages, use the Save button.
Search Diagnostics Tab
The Search Diagnostics tab will display any warnings or errors that occurred during the search operation. If the search job status was "Done w/errors", you should check the Diagnostics tab to see what kind of problem was encountered.
Synchronizing Directories
Hopper can perform rsync-style directory synchronization operations. For example, suppose we want to synchronize from directory DirA on host HostA to directory DirB on host HostB. There are several ways to do this, but for clarity we will show you the most straightforward way. First, open directory windows for both HostA and HostB. Select DirA on HostA and drag it atop the directory icon or name for DirB on HostB. From the resulting pop-up menu, choose Synchronize this Directory.
Once a synchronization operation is underway, it is run in the background as a file transfer job. Use the Transfer Manager window to keep track of the synchronization job. As with any file transfer job, the Transfer Manager allows you to display a file transfer monitor window so you can view details of the transfer (and this is where you can view results of dry runs). A couple of points worth noting:
- When syncing to HPSS, only the size and timestamp of a file will be used to determine if it needs updating — the actual content of the file is not examined.
- The Create an exact mirror option can cause files on the sink to be deleted, which can be a disaster if the sink directory is chosen incorrectly. There are Dry run and Backup options available that can reduce this risk.
Note that the synchronize operation will use the Unix rsync command for synchronize operations between Unix hosts. Hopper becomes a simple-to-use interface for performing a variety of rsync operations. When one or both of the hosts involved with the sync operation are not Unix, or do not support rsync, built-in sync logic is used instead. This logic supports syncs using a wide variety of transfer protocols, including FTP, NFT, and SFTP.
Synchronize Dialog
Before a synchronization operation is actually invoked, a tabbed dialog is displayed that describes the operation and allows you to set various options. The initial tab describes the requested operation, including source and sink hosts and directories. The other tabs allow finer control over different aspects of the operation to be performed.
Description Tab

The Description tab describes the two hosts and directories involved with the synchronize operation. Pressing OK will cause the sync operation to begin.
Function Tab

The function tab provides the main control over how the sync operation will be performed. The default operation is to replace destination files that are "different" -- i.e., either in content, size, or timestamp. Many additional variations are possible, including ignoring timestamps when comparing files by looking at size only. One can also request that only pre-existing destination files be updated. Alternatively, one can request that pre-existing destination files be ignored, causing only missing files to be transferred.
Include/Exclude Tab

The Include/Exclude tab allows you to use wildcards to include or exclude patterns from the operation. In this example, we have excluded any files ending with a tilde, and all files named "core". One can use both include and exclude patterns in the same operation.
Window Tab
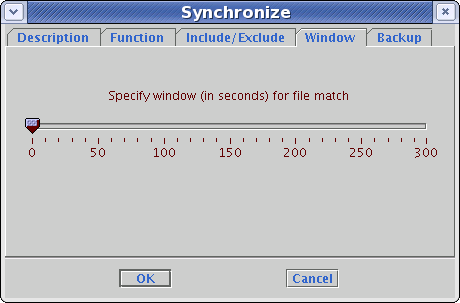
The Window tab modifies the timestamp comparison used by the sync operation. If the times on the source and sink systems are off from one another, the window operation expands the range of times that are considered identical. E.g., setting this to 10 means files within ten seconds of one another are considered to have the same timestamp.
Backup Tab
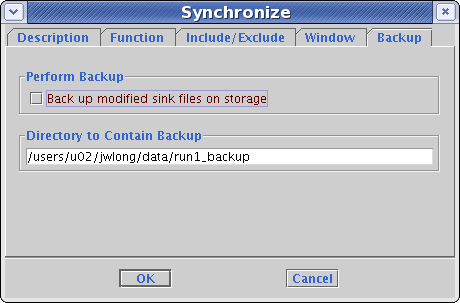
The Backup tab controls the generation of a backup directory on the sink host. This directory will contain backups of any sink files overwritten during the sync operation. Note that this can be slow and can use a lot of additional space. Note also that if you are uncertain what a particular sync operation will do, you can choose "Dry Run" on the Function tab to see what would happen without actually doing it.
Making Archive Files
Hopper supports the creation of and operation on a number of archive file formats, including TAR, HTAR, ZIP, and JAR. Creation of these files is treated like a file transfer job, so see the file transfer help page for details on monitoring progress of these jobs. Creating an archive file can be done in a number of ways. Most simply, just drag the files and directories you want to collect and drop them into a directory icon or open space in a directory window. In the resulting drop-menu, choose "Make TAR Archive Here..." (e.g.)
Making TAR Files
If you're viewing files in a directory window and wish to create a TAR file from some of those files, just select the items of interest and drag them into white space of the directory window. The drop menu you'll see will look something like:

Selecting the TAR option will bring up the create tar dialog:
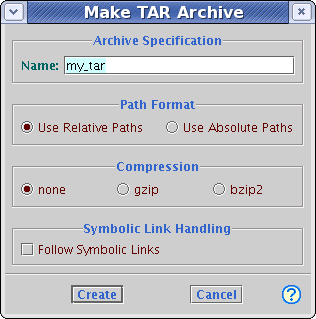
Note that the correct file suffix will be added automatically, based on compression options you choose (e.g., ".tar", ".tar.gz", ".tar.bz2"). You can override this by supplying a suffix when entering the archive name.
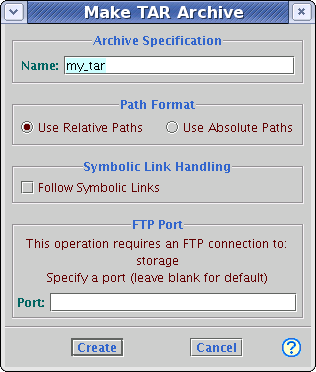
A very powerful option when creating TAR archives is to stream the tar file contents to a remote host over an FTP connection. The result is a single TAR archive on the remote host, but with the advantage of it being done with just a single transfer. This can be 10 or more times faster than copying individual files due the speed up of aggregation. When creating a remote TAR like this, you must be able to connect to the remote host via FTP. Here's how the tar creation dialog looks when doing this operation (note the FTP port option, which most of the time you can ignore):
A variation on the remote TAR archive is the remote Indexed TAR archive. The only difference with this option is that an additional file, called an index, is created which catalogs the contents of the archive. The pairing of the archive and index files can be operated upon directly by the HTAR program.
Making HTAR Files
When running Hopper on LC production hosts users have the ability to create HTAR archives. The mechanism is very much like for TAR archives as explained above. HTAR is a program provided as part of HPSS for doing very high-speed transfers of data to and from HPSS. The fast transfer rates are the result of aggregation (combining many small files into one larger one), plus parallelism.
If you find yourself moving small files to storage (HPSS), especially in large quantities, you should definitely consider using HTAR for these transfers. HTAR can be 10 to 50 or more times faster than transferring the same files individually.


With the current version of HTAR one should be careful about the size of archive being created. Archives that span multiple tapes are "legal", but not recommended due to the increase in the time it takes to retrieve data from such archives, plus the increased risk of being spread across multiple tapes. Archives of roughly 300GB or less are recommended. Note that a near-future version of HTAR will automatically split huge archives into families of files, so that no one segment will span a tape boundary.
Making ZIP/JAR Files
Hopper can also create JAR and ZIP archives using the same mechanism as described for TAR and HTAR. For these archives, the source files and the resulting archive must be on the same host on which you're running Hopper.


Performing Aggregated Copies
The aggregated copy operation is a hybrid of a normal copy and an HTAR archive creation. It is the optimum way to move large amounts of data from LC production hosts to HPSS. You define a set of rules which describe what parts of your directory tree should be aggregated into HTAR archives, and the remaining parts are transferred with normal copies.
Why is this the optimum way to move your data to HPSS? Let's consider the alternatives. One option is to do a straight copy of your entire directory structure into HPSS. This is fine if you only have a few files or if your files are all multi-GB in size. Otherwise, there's a tremendous time and HPSS resource overhead in copying files this way. The other alternative is to use HTAR to aggregate your files into an indexed tar file in HPSS. Because of parallelism and the lack of separate connections required for the individual file copy approach, this is 10+ times faster than the first option. The drawback of HTAR is that for best results you should keep the final archive to 300GB or less. If you have a giant directory structure with millions of files and TBs of data, creating a single HTAR file from that will make it difficult to retrieve data later.
Hopper's aggregated copy operation breaks up massive transfers into pieces you define, such that you get the performance benefit of using HTAR but without the risks of putting everything into one massive HTAR file. These pieces are described using patterns that define the contents of each HTAR file to be created. For example, you can use a pattern such that each cycle's restart directory goes into its own HTAR file. (See examples section below.)
Aggregated Copy Dialog
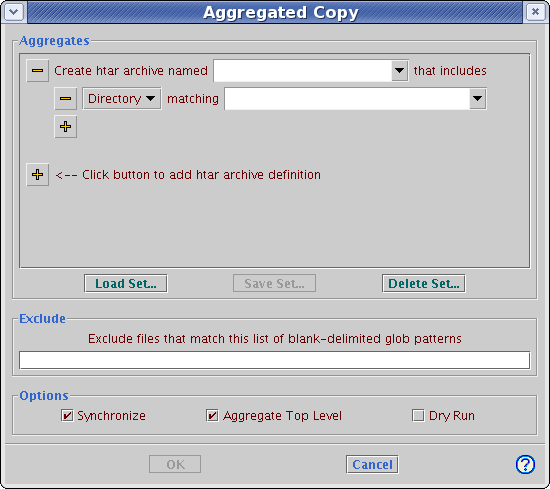
After you select "Aggregated Copy Here..." from the drop menu, a dialog is displayed that lets you describe in detail how the operation will function. The upper part of the dialog lets you describe the rules for defining what goes into each HTAR archive. These rules can be saved and re-used later. Also, various options for modifying the standard behavior of the operation can be set. For convenience, various rule sets have been pre-defined.
Htar Archive Name
Click on the outer "+" button to add an HTAR archive definition. The field "Htar archive name" contains the name of the archive to create. For example, if you want all of your C source files to go into one HTAR archive, you could enter "c_files.htar" as the name. There are two special variables one can use in this name field to indicate that a series of HTAR files should be created: %c is a substitute for a string of digits (i.e., cycle number), and %n is a substitute for the name matched by the File/Directory elements. See the examples section for more details.
Htar Archive Elements
Click on the inner "+" button to add elements to the HTAR archive definition. These are the files and/or directories which make up the contents of the HTAR file. The field can contain normal Unix wildcard patterns, plus the %c special variable defined above:
- * — Matches zero or more instances of any character
- ? — Matches one instance of any character
- [...] — Matches any of characters enclosed by the brackets. Additionally if the first character following the opening bracket is ^, then any character not in the character class is matched. A - between two characters can be used to denote a range.
Managing Rules
The "Load Set", "Save Set", and "Delete Set" buttons are for managing the rules definitions created in the Aggregates section of the dialog. To store a rule set for future use, click "Save Set". To load a previously saved set, click "Load Set". To remove a rule set definition, click "Delete Set". Note that the most recently used rule is pre-loaded when the Aggregated Copy dialog is displayed. You can switch to a different rule with "Load Set". If you prefer not to have a rule automatically loaded in this way, you can disable the behavior with a user preference at File->Preferences->Operations->Aggregated Copy.
Exclude
The Exclude field allows you to specify a blank-delimited glob (Unix wildcard) pattern for matching items that should be excluded from the aggregate copy. For example, if you want to ignore core files and Emacs back-up files, use "core *~" in this field. Note that these exclusions apply to non-aggregated files and to top-level items that would be aggregated. Exclusion does not apply to items in sub-directories of aggregated directories.
Options
Several options allow you to control the behavior of the aggregated copy operation. The Synchronize option, on by default, prevents existing files from being re-copied unless the timestamp of the file in the source directory is newer than the one in HPSS. The Aggregate Top Level option, on by default, causes the aggregation rules to be applied to the top-level items (i.e., the items you selected and have dragged over to the storage window). The Dry Run option, off by default, lets you see the result of performing the selected operation without actually performing any copies. You can see the results of this operation in the Transfer Manager dialog, just like any other copy. The Dry Run option is especially useful when you're putting together new rule sets.
Note that the initial settings of these options can be controlled via user preferences; see File->Preferences->Operations->Aggregated Copy.
Examples
Example 1 - Simulation Output with Cycle Numbers
run1/
        abc00000/
        abc00000.root
        abc00000_vis/
        abc00001/
        abc00001.root
        abc00001_vis/
        ...
        abc00555/
        abc00555.root
        abc00555_vis/
        input.txt
        errors.txt
Each of the "abc" directories, such as abc00000, contains hundreds or thousands of files. The objective is to gather all results from a single cycle into one HTAR archive. Thus, everything from cycle 0 (the directory abc00000, the directory abc00000_vis, and the file abc00000.root) would go into one HTAR file, everything from cycle 1 into another, and so on. Because the entire run1 directory may contain many TBs of data, the aggregated copy is an ideal way to storage this information.
How to describe this in the aggregated copy dialog:
| Htar archive name | abc%c.htar | Note the use of %c to designate the cycle number. %c expands to a specific set of contiguous integers. |
| Directory matching | abc%c | The %c cycle number matches the one used in the name. |
| Directory matching | abc%c_vis | The %c cycle number matches the one used in the name. |
| File matching | abc%c.root | The %c cycle number matches the one used in the name. |
Example 2 - Each Sub-Directory into its own HTAR Archive
dir/
        docs/
        input/
        output/
        sources/
        file1
        file2
In this example we want each sub-directory to be written into its own HTAR archive. This makes use of another special variable, %n, which maps to the name matched by the Unix wildcard.
How to describe this in the aggregated copy dialog:
| Htar archive name | %n.htar | Note the use of %n to designate the name of the directory matched in the next section. This allows the resulting HTAR file to have a name matching the directory. |
| Directory matching | * | I.e., match any directory |
For this set of rules, it is important to pay attention to the value of the "Aggregate Top Level" option. If you drag "dir" to storage, and have "Aggregate Top Level" checked, then you'll end up with a single HTAR "dir.htar" containing everything. You should either uncheck the "Aggregate Top Level" option if you want to drag "dir", or else leave the box checked and drag the contents of "dir" instead—i.e., "doc," "input," "output," etc. This latter operation will result in a "docs.htar," "input.htar," "output.htar" as well as some individual file copies.
Notes
Note that the output from the aggregated copy contains summary information about the operation, including number of files written, number of htar archives created, and so on. Importantly, any htar archives that are overwritten, e.g., as the result of using the "update" mode of aggregated copy, are displayed with a line such as:
(I) Overwriting existing archive: /users/u02/jwlong/junk/test.htar: old size = 11651072, new size = 10468864
If the htar size shrunk considerably, this could be the result of files being purged or intentionally removed from the source directory. Be sure to monitor this if you fear that your files may have been purged. If you do find that an htar archive was overwritten with an unintentionally smaller subset, the original htar archive can be retrieved from the Hopper trash can in HPSS, located at ~/.HopperTrashCan in your storage home directory.
Reviewing Disk Usage
Hopper is able to display disk usage information for any directory being viewed. Click on the "Pie Chart" ) in the toolbar to open the disk usage pane. Note that when the disk usage pane is enabled there still is a small pane showing the "normal" view of your directories. You can adjust the relative sizes of the two panes however you like. The first time you enable the disk usage view you'll see something like the following, which indicates that the disk usage information for this directory hasn't yet been generated.
Disk usage view with no information generated yet
Disk Usage Scans
Click on the "Scan" icon () in the lower right of the window to initiate a disk usage scan. The time it takes to generate the scan varies with the speed of the file system and the number of files you have. While the scan is underway, progress information shows the total number of files scanned and the number of files being scanned per second. Ballpark rates for scans are: 20,000/s for local disks, 500/s for NFS-mounted directories, 120/s for HPSS, and 30/s for Lustre. Your rates will vary, as caching, heavy load, and other factors can significantly impact performance. Once the scan has completed, you will see a graphical representation of the disk usage in the given directory.
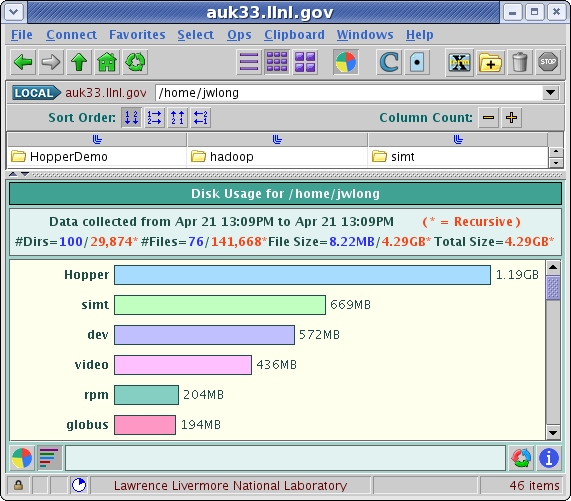
The summary information at the top of the pane shows how many directories and files are in this directory, both inclusive and exclusive. File sizes, inclusive and exclusive, and total space under this directory, are all shown. To traverse into a sub-directory just click on the directory name or the shaded bar.
Managing Disk Usage Scans
The Disk Usage Monitor lists active scans for both local and production hosts, and also allows you to terminate these scans. Display the monitor by clicking on the "Info" icon () in the lower right of the disk usage pane. The Disk Usage Monitor dialog looks like this:
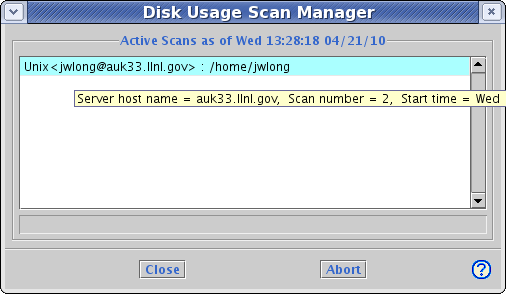
To get more information about a scan, hover the cursor over a line until the tooltips text is displayed. To abort an active scan, press the Abort button. To get a new list of active scans, dismiss (Close) the dialog and re-display it.
Note that when the disk usage monitor first comes up, it retrieves a list of active scans both from the local system and, in some cases, from an LC production host. This latter case can result in a username and/or password prompt in some situations. If you don't want to retrieve the list of remote scans, cancel out of the username or password prompt.
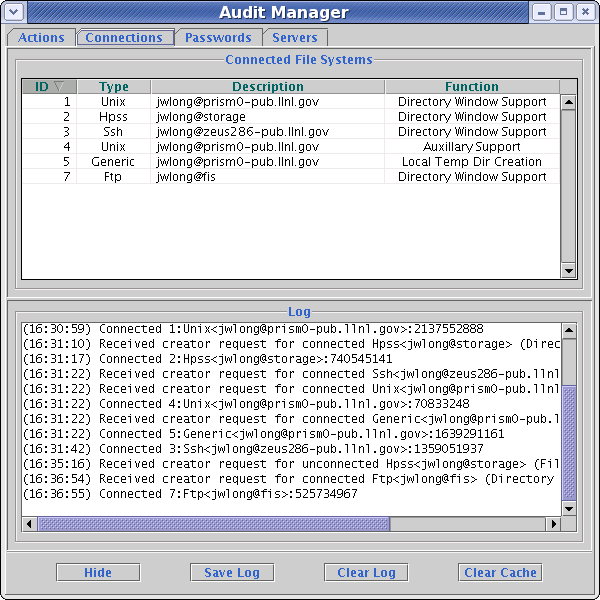
Audit Manager
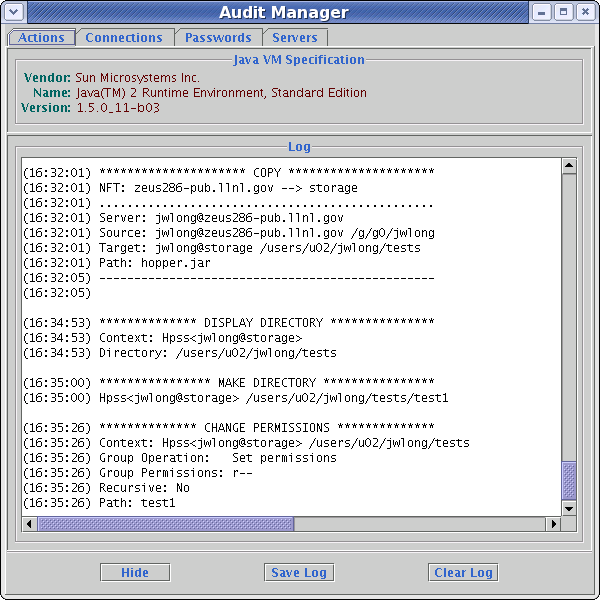
Hopper provides a detailed audit trail of activities it performs, including actions, connections, password operations, and server connections. Available via the Windows -> Audit Manager menu item, the Audit Manager is the place to go to see what the Hopper client is up to. While this information is very useful for debugging, it is also useful to learn what all Hopper is doing behind the scenes.
Actions Tab
The Actions Tab in the Audit Manager dialog shows all of the actions you've requested in the current Hopper session. The tab starts off with the version of Java being used and the current preference values. Then each operation requested by the user is briefly described, and any error messages from performing that operation are logged.
Connections Tab
The Connections Tab in the Audit Manager dialog shows all of the connection activity performed by the Hopper client. This includes connections in support of Hopper directory windows as well as possible connections for performing operations in parallel with other activities. Note that Hopper is multi-threaded, so to allow activities to be performed even while transfers are occurring requires multiple connections.
Passwords Tab
The Passwords Tab in the Audit Manager dialog summarizes Hopper's handling of passwords and passphrases. Hopper can manage passwords during a single session, thus minimizing password prompts.
Servers Tab
The Servers Tab in the Audit Manager dialog shows local and remote connections to Hopper servers. When running on or connecting to LC production hosts, Hopper runs a server as a detached process. This allows the client to be terminated while the server continues to perform the requested transfer, search, and other operations.

In the above example a local server was started on prism to perform a search operation, while a separate server was launched on zeus to perform an operation there.
Miscellaneous Operations
Viewing Files
Hopper is able to open both local and remote files for viewing. Local files are viewed in situ; remote files are first transferred to the local host before being viewed. If you want to launch commands on a remote host, see the section on launching commands.
Viewing a file is as easy as double-clicking on it. Hopper has a built-in viewer which works with text, html, and various common image formats. Using preferences you can change the default viewer based on the file extension. You can also choose an alternative viewer on the fly by using the right mouse menu to invoke the built-in or other viewer. On the Mac the default viewer is the OS X "open" command, which performs the equivalent action as double-clicking on the file in a Finder window.
The built-in viewer has a limit for the size of objects it can display. This is in place to avoid out of memory situations. You can change this maximum size via the preferences. For text files larger than this maximum size, the first part of the file will be displayed. You have the option in the built-in viewer to save a local copy of the entire file.
Preferences related to viewing files are at: File->Preferences->Operations->File Viewer.

Comparing Files
Hopper can be used to compare files using a simple drag-and-drop technique -- just drop one file you wish to compare onto the file you want to compare it against. Hopper will automatically perform any necessary file transfers in order to get both files onto the local host where the comparison is performed.
Hopper supports both external differencing tools and a built-in one. On Unix-based systems the default is to use xdiff if available, or diff otherwise. You can specify an alternate external diff tool via the "Path to xdiff" preference at File->Preferences->General->Paths of Executables. If you prefer to use the built-in differencing option instead, this can be set at File->Preferences->Operations->File Comparison. For Windows systems the built-in differencing option is the default as it can run anywhere.
The built-in differencing tool is an Open Source tool called JMeld, which is based on the Meld tool available in many Linux distributions. JMeld supports basic comparisons and document merging. Use the small arrows in the center column between the two file listings to choose one diff over another. Merged files can be saved using the Save icon next to the file names. Once in JMeld, you can perform other diffs, including comparing two local directory structures.
JMeld supplies a variety of keyboard-based operations as well. You can review these via JMeld's Help menu. As improvements to JMeld are made they will be incorporated into future versions of Hopper.
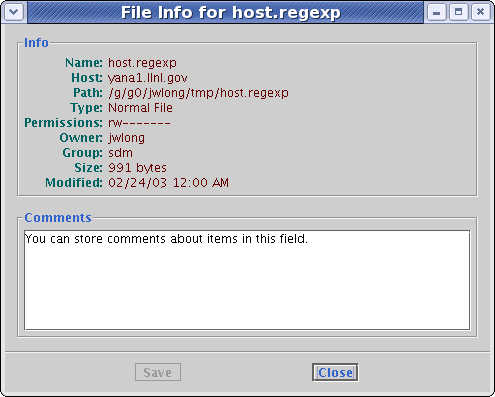
Getting File Info
Details about an individual entry are available via Hopper's Get Info command. First select the item of interest, then choose Get Info from either the right mouse menu or the main Ops->Ops on Selected Entries menu. This is perhaps most useful when your directory window is in Iconic format and you want to see the size, permissions, or other attributes of a given file or directory.
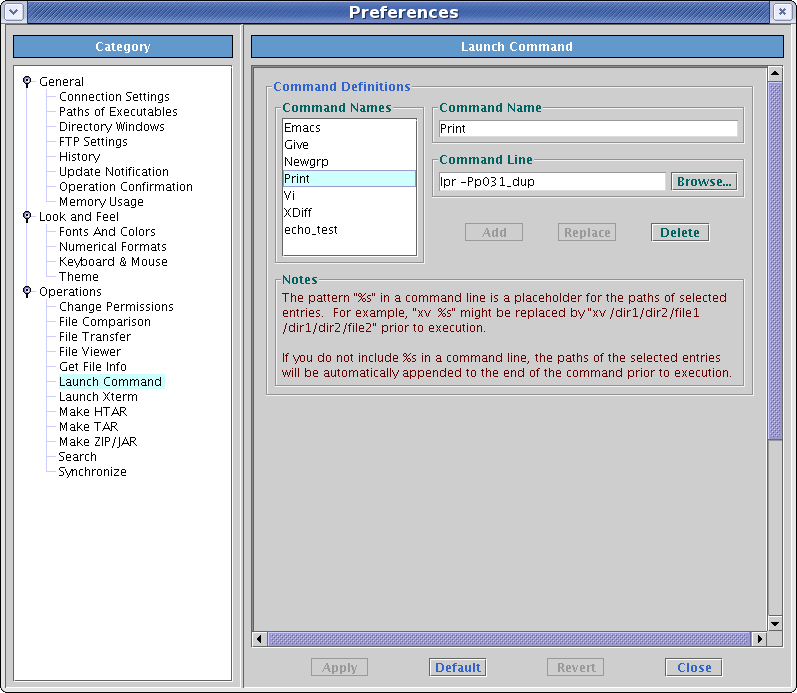
Launching External Commands
Commands can be launched on local or remote Unix systems using Hopper's Launch Command feature. This can be a useful way to extend Hopper's capabilities, as it makes it convenient to e.g., launch an editor, perform an svn operation, or run lpr to print a file. When you connect to remote hosts through Hopper's ssh option, you can launch the same commands on remote hosts. This makes it easy to edit a remote file without opening a separate terminal window to that remote system.
Launch commands are defined at File->Preferences->Operations->Launch Commands.
Launching Xterm Windows
When you want to do things on a local or remote Unix host outside of Hopper, the Launch Xterm capability is useful. Pressing the Xterm button ( ) in Hopper's toolbar will open an xterm window connected to the given host, and automatically positioned in the same directory as you are viewing in Hopper. Preferences are set at File->Preferences->Operations->Launch Xterm.
Changing Access
Access privileges can be set using Hopper's Change Permissions and Change Owner/Group operations. Note that these operations are simply two tabs in the same dialog.
Changing Permissions
The Change Permissions operation is available via the right-mouse menu and the Ops->Operations on Selected Entries menu. By default the control panel in the Change Permissions dialog is very simple:
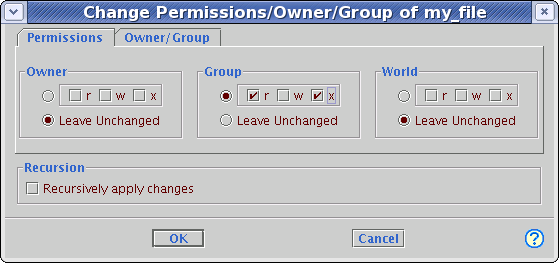
If you find that the default is too limited, check out the options in File->Preferences->Operations->Change Permissions—you can choose which features are available via the dialog. Typical settings for a power-user would be to check the "Smart X", "Same As", and "Recursive" boxes, which results in this:
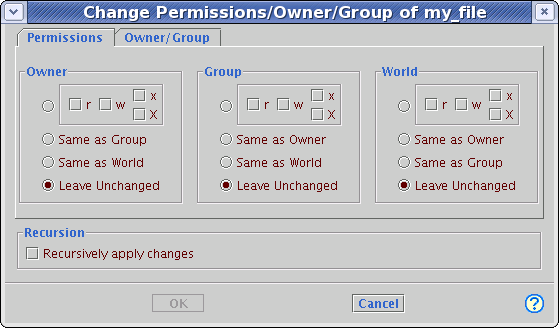
Check the Operation checkbox in the preferences to see the full range of all of the dialog's options:

Smart X performs the same function as the upper-case X bit in the Unix chmod command. That is, Smart X will add the "x" (execute) bit if the given item is either a directory or is a file that already has the "x" bit set for some user. An example helps explain how this is useful. Say you have a deep directory structure containing text files at various levels. The tree currently is accessible only to you, but you'd like to make the tree available for your work group. You could recursively change the permissions for the entire tree to add group read and execute bits, which are required to allow people to traverse the directory structure. That incorrectly would mark all of the text files as executable too, though, so you'd need to go back and remove the group execute bit on all of the files. Using the Smart X option you could do this in one step -- it would set the execute bit only where it is appropriate to do so. Smart X is indicated in the dialog as an upper case X.
Changing Ownership and/or Group
The Change Permissions operation is available via the right-mouse menu and the Ops->Operations on Selected Entries menu. Note that this is just another tab on the Change Permissions/Owner/Group dialog:

To change the group just type in the name of the desired group and press the OK button. Note that previous owner/group values you've entered are remembered between sessions, so you can also select from the pop-up menus as shown above.
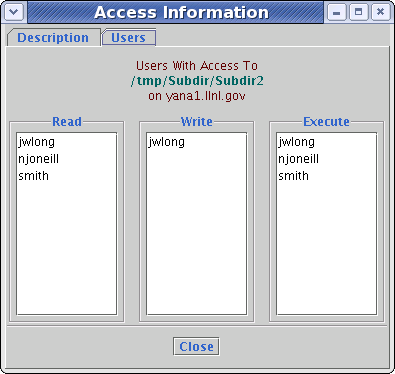
Checking Access
A unique feature in Hopper is the ability to check the access of a file or directory. This operation takes into account the permissions of the item itself, as well as all of its parent directories. The result of the operation is a list of all users with read, write, and execute permission on the given item. This is a good way to confirm that you haven't overlooked the changing of directory permissions when trying to give a colleague access to a file. Or to make sure that your file can only be read by those people you want.
The initial view gives a description of who has access:
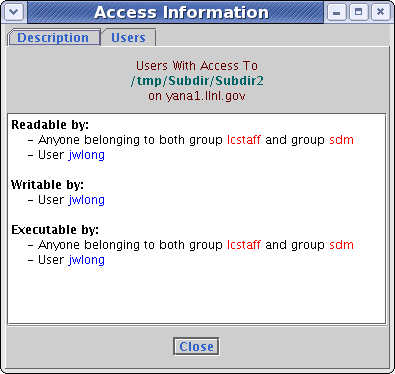
The Users tab in this dialog lists the actual user names in the three categories. Note that this information may not always be available.
Deleting Files
To delete items in Hopper, first select the item(s) and then click on the Trashcan icon in the toolbar () By default you will be requested to confirm the deletion operation. You can disable the confirmation via File->Preferences->General->Operation Confirmation.
Note that the delete operation in Hopper is recursive. If you delete a directory its contents will also be deleted.
In the special case of working with LLNL HPSS, Hopper's delete operation will simply move the requested items into a directory called ~/.HopperTrashCan in your storage home directory. This is done to allow undoing of unintended deletions, as well as to speed up the otherwise slow delete operation. You can empty the .HopperTrashCan directory by using Hopper's delete operation on it.
Creating Directories
To create a new directory, just click on the New Folder icon (. In the resulting dialog type in the name of the directory you wish to create.
Renaming Files
Files can be renamed in a couple of ways. The simplest is to select the item to be renamed and press Return. This puts Hopper into rename mode whereby you can edit the name. Alternatively, you can select the Rename operation from the right-mouse menu or the Ops->Ops on Selected Entries menu.
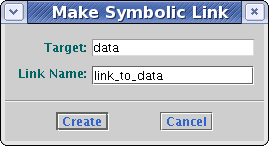
Creating Symbolic Links
Creating symlinks via Hopper is done by highlighting an item and then selecting the "Make Symbolic Link" option in the right-mouse menu or the Ops->Ops on Selected Entries menu. The resulting dialog lets you set the link and target names:
Favorites
Hopper has a Favorites mechanism for simplifying access to frequently visited hosts and directories. The concept is similar to web bookmarks. If you have a set of directories you are always jumping between, just define them as Favorites and then pop from one to the other via the Favorites menu.
Favorite connections combine the following elements: username, host, connection technology, and starting directory. So for example you can define a favorite to be a particular sub-directory in HPSS. When you access that favorite, Hopper will connect to storage and then traverse to the given directory, all in one step. Favorites can include pretty much anything Hopper can view—even a particular directory inside a tar file on a remote host!
To create a Favorite connection, just make the connection to the desired host and traverse to the desired directory. Then choose "Add Connection..." from the Favorites menu. Enter a connection name, such as "Storage:MyProject," or use the default name. Then press the Add Connection button. You will now see this connection in the Favorites menu, ready to use. If you want this connection to be made automatically when Hopper starts up, choose "Manage Favorites" from the Favorites menu, select the desired connection, click the Properties button, check the Autoconnect box, and finally click the Update button.
Favorites Manager
Once you've created favorites you can manage them from the "Manage Favorites" item in the Favorites menu.
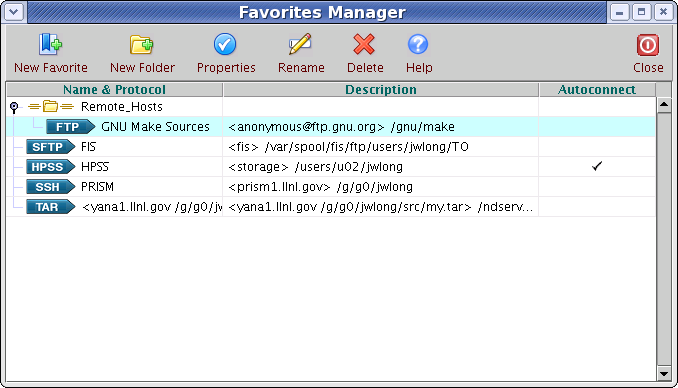
This dialog allows you to organize your favorites into hierarchies, etc. You can also create new favorites or edit existing ones. To edit a favorite, highlight it and then click on the Properties button. The properties panel allows you to change a favorite's name, mark it to be automatically connected whenever you start Hopper, and so on.

FAQ
General
Q. What is Hopper?
A. Hopper is a powerful, interactive, cross-platform tool for performing file management and data transfer tasks. Through Hopper's graphical interface, a user can perform operations on files and directories that reside on the local host, on remote hosts, and on remote resources such as HPSS.
Q. How do I submit feature requests, bug reports, or other feedback?
A. Send feature requests and feedback to hopper-feedback@llnl.gov. Problems should be reported to the LC Hotline, 925-422-4531 or lc-hotline@llnl.gov.
Q. Will Hopper run on my Mac/PC/Unix desktop?
A. Probably. Hopper runs on Mac OS X, Windows NT/2000/XP, and most variants of Unix. Basically, any platform that supports Java JDK 1.4 or later will likely run Hopper.
Usage
Q. How do I open multiple windows to one host?
A. There are several ways to do this. To open another window displaying the same directory, just choose the "Display in New Window" option from the File menu. To create a new window showing a sub-directory, single-click the middle mouse button on the icon or name of the directory you want to display in another window. This opens a new window displaying that directory's contents. You can also use the right mouse button over a directory entry and choose "Display in New Window" from the menu. (On systems with a one-button mouse, a right click can be generated by holding the Control or Command key down while clicking the mouse.)
Q. How do I transfer files or directories?
A. Transferring files and directories is done via drag and drop. Use the mouse to select the items you want to transfer, click and hold the left mouse button, drag the cursor to the destination of your transfer in another window, then release the mouse button. The cursor should change to a "happy face" when you're over a valid destination. Once you release the cursor a menu will pop-up showing your options. Choose "Copy Here" to initiate the copy.
Q. How do I move files rather than copy them?
A. Follow the directions from above for copying, but choose "Move Here" from the drop menu. Note that moves are only possible within a given host. I.e., you cannot move files from one host to another. If you need this behavior you can copy the files and then delete the originals.
Q. When in tree view, how do I copy into a sub-directory?
A. In tree view you must drag onto the folder icon of the sub-directory when you want to move or copy into it. Unlike in tabular view, dragging onto the neighboring whitespace is not adequate. A useful hint is to look for the folder icon turning red during the drag operation; this indicates that "dropping" there will deposit items into that folder.
Q. How do I get more information about my file transfer?
A. Within the Transfer Manager window, either double click on the transfer's status line, or single click on it and press the Details button.
Q. How do I interrupt a transfer or other operation?
A. To interrupt file transfers, select the line of interest in the Transfer Manager dialog, then click the Abort button. To interrupt other types of operations, press the red Stop button. Note that some actions are not interruptible, and will be indicated by the Stop button being disabled (grayed out).
Q. How do I select more than one file or directory?
A. In the tabular display mode, click on the first item of interest and Control-click on any additional items you wish to select. If you want to select contiguous items, click in the white space following a file or directory name and sweep the cursor up, down, or to the side to select a range. Selections in the detailed display mode are similar, but you can also extend a selection by Shift-clicking. If you want to select all items, choose "Select All" from the Select menu. (On a Mac, use the Command key instead of Control).
Q. How do I synchronize two directories?
A. Hopper can now perform rsync-style directory synchronization operations. This uses rsync when it is available, and uses built-in logic for doing synchronize operations involving hosts that do not support rsync. For example, suppose we want to synchronize from directory DirA on host HostA to directory DirB on host HostB. To do this, first open directory windows for both HostA and HostB. Select DirA on HostA and drag it atop the directory icon or name for DirB on HostB. From the resulting pop-up menu, choose "Synchronize this Directory". Before a synchronization operation is actually invoked, a tabbed dialog is displayed that describes the operation and allows you to set various options. Take a look at the Function tab, which is of particular interest. Note that you can perform a dry run. Once a synchronization operation is underway, it is run in the background as a file transfer job. Use the Transfer Manager window to keep track of the synchronization job. As with any file transfer job, the Transfer Manager allows you to display a file transfer monitor window so you can view details of the transfer (and this is where you can view results of dry runs).
Q. What is the "C" button? What do you mean by "caching?"
A. The "C" button toggles directory caching. When active, a directory's content information is cached in memory for use during that session. This removes the need for a directory listing operation the next time a previously visited directory is displayed. This can be useful when connected to very slow remote systems. Even when caching is on, Hopper will get a new listing if it knows the cached directory changed. When caching is off, a fresh directory listing is generated each time a directory is visited.
Q. How can I make Hopper use scp for file transfers?
A. By default, Hopper uses sftp for performing secure file transfers. There are a number of good reasons for this, including better throughput and fewer authentications. If you need to use scp, though, just open the Operations->File Transfer preferences and select the "Use SCP if possible" option.
Q. How do I tell Hopper to pass command line flags to ssh, scp, or sftp?
A. Simply enter the command line flags following the executable names in the Connection->SSH preferences. For instance, if you're using certain versions of OpenSSH clients and want to force protocol-1 to be used, set the ssh path preference to "ssh -1".
Q. How should I connect to storage (HPSS)?
A. Using the "Connect to Storage" item from the Connect menu will use the best available technique for connecting to storage from the given host. On LLNL production hosts there are three choices for connecting to storage: Storage, NFT, and FTP. The Storage option utilizes the HPSS client API, and provides a full- featured interface to storage. This includes changing permissions and group values. Transfers from production machines use parallel FTP. The NFT option is comparable to the NFT command line client; performance is slower than HPSS for some operations, but transfers are parallel and persistent. The FTP option uses standard, serial FTP transfers, and offers a reduced set of functionality.
Q. Why do my xterm windows go away when I exit Hopper?
A. By default, xterm windows launched via Hopper will persist after Hopper exits. However, this behavior can be changed via the "Preserve remote xterms" item in the Operations Dialogs -> Launch Xterm preferences. If your xterms are going away against your wishes, restore this preference to the factory setting.
Q. How can I make Hopper correctly display or operate on directory names which contain Unicode characters?
A. On some Unix-based systems, setting an environment variable that defines localization will allow Hopper to display and/or operate on Latin Unicode paths correctly. Try setting LC_CTYPE to "en_US.UTF-8" before launching Hopper. This should work on many Unix systems, but on some it will be ignored, and on others it may slow Hopper interactivity.
Q. How can I find out what's going on behind the scenes with Hopper?
A. Hopper is a very complex application and often manages multiple connections and dozens of threads. The "Audit Manager" window (via the Windows menu) lets you see what Hopper is really doing. The Actions tab shows all of the high-level commands executed by Hopper, including transfers and other directory operations. The Connections tab shows all of the connections being managed by Hopper, including active and inactive (cached) ones. The Passwords tab shows information related to password prompts—e.g., who is asking for a password and why.
Troubleshooting
Q. Something went wrong. Where do I find the error messages?
A. If an error occurs during a non-transfer operation, Hopper's status field will say "ERROR -- CLICK HERE FOR DETAILS". Clicking on that message will bring up the diagnostics window, which you can get to at any time via the Windows menu. If an error occurs during a file transfer, information is displayed in the Transfer Manager window, also available via the Windows menu. If an error occurs during a search, see the Search Manager window.
Q. Why can't Hopper connect to [host]?
A. First, make sure that the host is up and accepting connections by trying to connect manually. (Use the same option you tried in Hopper—e.g., if you tried to open an ssh connection in Hopper try running "ssh host" from a shell window). If the manual connection works, double check your "Connection Types" preferences to make sure everything is correct. For failed ftp connections, try changing the "passive mode" preference value. If you're still stuck, contact the LC Hotline.
Q. I'm getting fewer (or more) password prompts than I expected. Why?
A. Hopper does a lot of work to reduce the password prompts you see; freed connections are cached and re-used and authentication information is stored during the session and re-used whenever possible. However, Hopper is a highly concurrent application; you can start one transfer, manipulate files in the source or sink window during the transfer, and even start additional transfers. The price for this flexibility is that multiple connections are required. In most cases, you'll only have to enter your password for a given host just once. In the worst case, however, a password prompt is required for each connection. On systems that support it, you can reduce password prompts by setting up SSH keys. There are some cases when using scp transfers that you will have to authenticate frequently, possibly once per file moved. For this reason we set the default secure transfer mode to sftp, and encourage its use.
Q. Hopper sometimes slows down if I run it on a remote host and display it locally. Why?
A. Hopper performs well on local and most remote systems. Slowdowns are usually caused by the remote host being heavily loaded (check the load average reported by the Unix 'uptime' command.) Also, we've seen some versions of SSH that perform poorly when tunneling X11. Java applications are particularly sensitive to SSH's implementation of X tunneling. OpenSSH versions other than 3.6p1 seem to have the best X tunneling performance. One way to speed up X11 applications is to disable X tunneling, such as with the xauth application. Note that when SSH X tunneling is bypassed any passwords entered via Hopper will be sent in the clear over the network.
Q. Double-clicking on the Hopper jar file on my Windows system does not launch Hopper, even though I have the proper Java installed. Why not?
A. Windows systems usually have an association between jar files and java, such that double clicking on a jar file launches java. This is not always set up, though, especially on XP. For this reason we now distribute Hopper as a self-contained exe file for Windows to avoid these potential issues. The exe file also verifies that a recent-enough version of java is available.
Q. I'm seeing really odd looking windows when I run Hopper on a remote system and displaying it with X11 on my Mac. Why?
A. We've seen this behavior on Macs running OS X 10.4 (or later) when the connection to the remote system was made with ssh. X11 tunneling behavior changed in recent versions of OpenSSH, causing problems when connecting to some older servers. To preserve backward compatibility, use the -Y command line option when making an ssh connection. E.g., "ssh -Y hostname". Note that related problems can occur on non-Macs running newer versions of OpenSSH; use the -X or -Y command line flag to work around the problem, depending on the version of ssh client you're using.
Q. Why doesn't the "Launch Xterm" button work on the Mac?
A. It will work, but requires some set-up. There are three things to check. The first needs to be done each time you run Hopper. The last two need only be done once.
- Make sure the "X Window System" application (usually at /Applications/Utilities/X11) is running.
- Make sure ssh is set up to forward X11. This can be done by adding a command line option in the Hopper preference for ssh (Preferences->Connections->SSH->Path of ssh). For Macs running OS X 10.4 or higher, set this to "ssh -Y." For Macs using an older OS, set this to "ssh -X."
- Make sure your DISPLAY environment variable is set by running this command in a terminal window:
defaults write ~/.MacOSX/environment "DISPLAY" ":0.0
After executing this command, log out and log back in again, and Hopper should be able to launch local and remote Xterm windows.