
Overview
If you want to pull or push data from/to a GitLab repo living at either https://lc.llnl.gov/gitlab or https://rzlc.llnl.gov/gitlab while working on an LC machine, please follow these steps:
- Create an RSA ssh key pair in the zone (CZ, RZ, or SCF) from which you want to interact with a GitLab repo.
- Add your public key, id_rsa.pub, to your GitLab account in a browser.
- Test that you can connect to the relevant GitLab server from the zone (CZ, RZ, or SCF) where you'll be working.
Note that $HOME directories are shared across all machines within the same zone. So, if you have accounts on oslic and dane, following the above steps on oslic will allow you to work with LC GitLab from quartz as well.
Step-by-Step Instructions
- Step 1: Create an RSA ssh key pair
-
You need to create an RSA ssh key pair on the machine from which you want to interact with a GitLab repo. Concretely,
- Enter the .ssh subdirectory under your $HOME: cd $HOME/.ssh. (Note that .ssh is a hidden directory and will not be visible under your $HOME by default.)
- Run ssh-keygen -t rsa -b 4096 after reading the following sub bullets:
-
The set of output, including prompts and responses from you, from running ssh-keygen should look something like the following:
[janeh@izgw3:.ssh]$ ssh-keygen -t rsa -b 4096
Generating public/private rsa key pair.
Enter file in which to save the key (/home/janeh/.ssh/id_rsa):
Enter passphrase (empty for no passphrase):
Enter same passphrase again:
Your identification has been saved ...
- Note that you will first be asked for a filename. The default should be something like $HOME/.ssh/id_rsa. Accept this default by hitting Enter.
- Note that you will next be asked for a passphrase. Do NOT enter a passphrase. Skip this step by hitting Enter. Hit Enter a second time when asked to confirm your passphrase.
- The names of the files created and a bit of keyart will then be printed to standard out. You don’t need to do anything with the keyart.
-
- After running ssh-keygen and responding to the ensuing prompts, check that the files id_rsa and id_rsa.pub exist in your $HOME/.ssh directory.
- Step 2: Add Your Public Key to GitLab
-
To add your public key, id_rsa.pub, to your GitLab account in a browser:
1. In a browser, go to either https://lc.llnl.gov/gitlab or https://rzlc.llnl.gov/gitlab and log in. (See docs for help.)
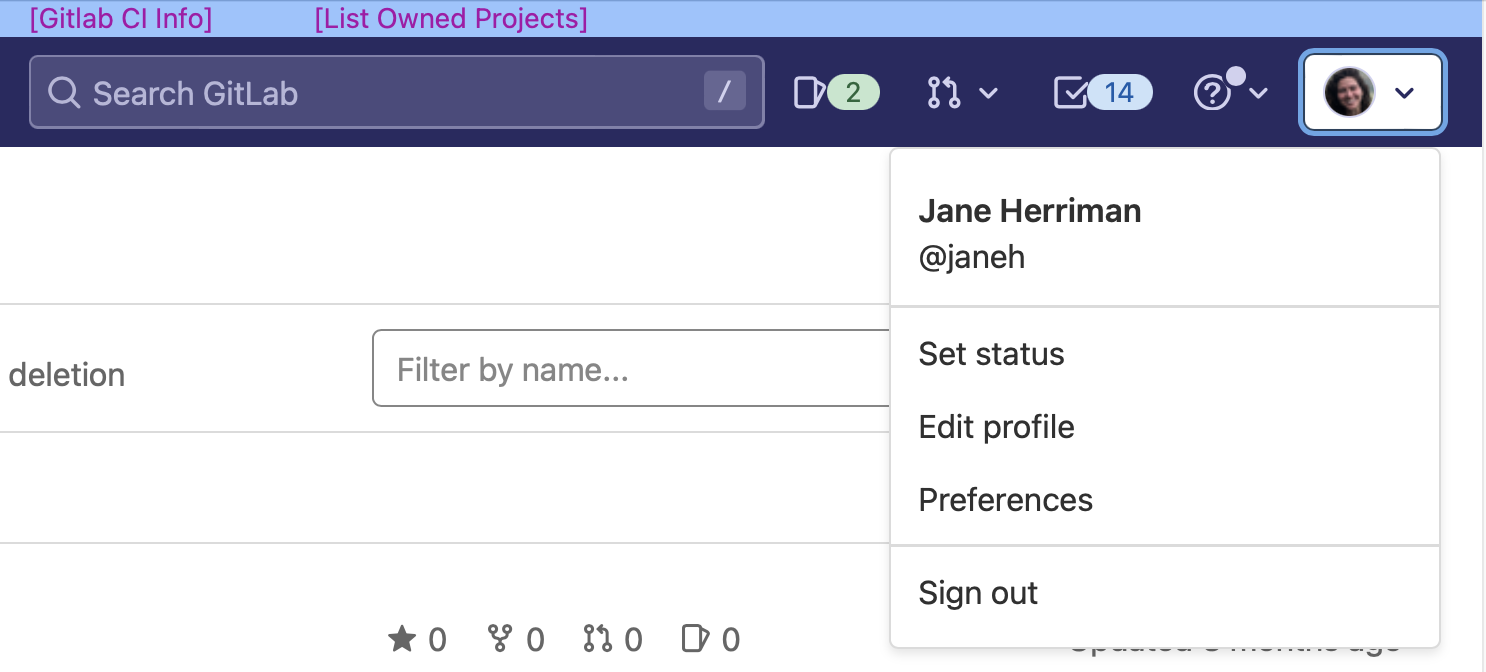
2. In the upper right corner, you will see an icon for your account with a drop down arrow to the right. Hover over this arrow to display options and select “Edit profile”.
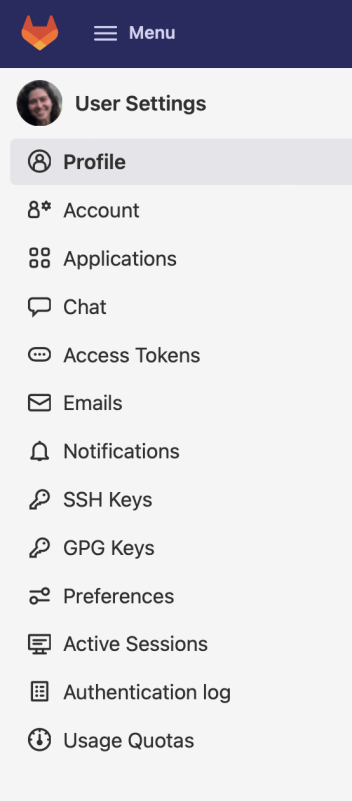
3. A menu on the lefthand side will now appear. Select “SSH Keys”.
Gitlab Menu:
4. You will now see a page where you can enter ssh key information:

- Copy the text in the file id_rsa.pub and paste it into the text box under the “Key” field.
- Provide a “Title” identifying the machine where you generated the associated ssh key pair.
- Do not enter an expiration date. This will allow the key to persist indefinitely.
- Click “Add key”.
5. You should now see an RSA key listed under “Your ssh keys” on the same page.
- If you want to use repos both at https://lc.llnl.gov/gitlab and https://rzlc.llnl.gov/gitlab, you have to repeat the above setup for both GitLab servers.
- Step 3: Add Your Public Key for LC systems
-
Add your public key to LC systems. This step adds the newly created key to your LC home directory which will allow you to hop between LC systems.
While on an LC system, run the command
ssh-copy-id `hostname` - Step 4: Test Your GitLab connection
-
Test that you can connect to the relevant GitLab server.
If the repo you want to talk to lives on CZ GitLab (https://lc.llnl.gov/gitlab), run:
ssh -p7999 git@czgitlab.llnl.govIf the repo lives on RZ GitLab (https://rzlc.llnl.gov/gitlab), run:
ssh -p7999 git@rzgitlab.llnl.govIf the repo lives on SCF, run:
ssh -p7999 git@scfgitlab.llnl.govAs a result, you should see:
1. You may be prompted “Are you sure you want to continue connecting (yes/no)?” Respond “yes”.
2. A successful connection will return something like
```
PTY allocation request failed on channel 0
Welcome to GitLab, @janeh!
Connection to czgitlab closed.”
```
